

Messaging Queues are widely used in asynchronous systems. In a data-intensive application using queues makes sure users have a fast experience while still completing complicated tasks. For instance, you can show a progress bar in your UI while your task is being completed in the background. This allows the user to relieve themselves from waiting for a task to complete and, hence, can do other jobs during that time.
A typical request-response architecture doesn’t cut where response time is unpredictable because you have many long-running requests coming. If you are sure that your systems request will exponentially or polynomially go large, a queue could be very beneficial.
Messaging queues provide useful features such as persistence, routing, and task management. Message queues are typical ‘brokers’ that facilitate message passing by providing an interface that other services can access. This interface connects producers who create messages and the consumers who then process them.
We will build a newsletter app, where users can subscribe to various newsletters and they will receive the issues regularly on their emails. But before we proceed let’s understand the working of workers + message queues.
Workers & Message Queues
Workers are “background task servers”. While your web server is responding to user requests, the worker servers can process tasks in the background. These workers can be used for sending emails, making large changes in the database, processing files, etc.
Workers are assigned tasks via a message queue. For instance, consider a queue storing a lot of messages. It will be processed in a first-in, first-out (FIFO) fashion. When a worker becomes available, it takes the first task from the front of the queue and begins processing. If we have many workers, each one takes a task in order. The queue ensures that each worker only gets one task at a time and that each task is only being processed by one worker.
We will use Celery which is a task queue implementation for Python web applications used to asynchronously execute work outside the HTTP request-response cycle. We will also use RabbitMQ, which is the most widely deployed open-source message broker. It supports multiple messaging protocols.
Build Newsletter App
We will build a newsletter app where a user can subscribe to various newsletters simultaneously and will receive the issues over their emails regularly.
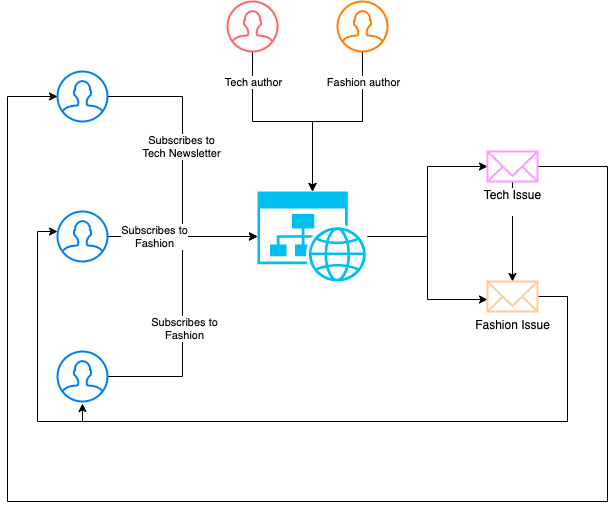
We will have our newsletter app running as a Django app with celery. Whenever authors publish a new issue the Django app will publish a message to email the issue to the subscribers using celery. Celery workers will receiver the task from the broker and start sending emails.

Requirements
- Python 3+ version
- Pipenv
Setup Django
Create a folder newsletter locally and install Django in a virtual environment. Inside folder run:
1pipenv shell2pipenv install django
Create an app:
django-admin startproject newsletter_site .
Setup the models:
python manage.py migrate
Make sure it works and visit http://127.0.0.1:8000/ :
python manage.py runserver 8000
Create the newsletter app:
python manage.py startapp newsletter
Installation
- Install celery
- Install dotenv for reading settings from the environment.
- Install psycopg2-binary for connecting with Postgres.
1pipenv install celery2pipenv install python-dotenv3pipenv install psycopg2-binary
Setup Postgres and RabbitMQ
Create a docker-compose.yaml to run Postgres and Rabbitmq in the background.
1version: '3'2services:3 db:4 image: postgres:135 env_file:6 - .env7 ports:8 - 5432:54329 rabbitmq:10 image: rabbitmq11 ports:12 - 5672:5672
Configuring settings.py
- To include the app in our project, we need to add a reference to its configuration class in the
INSTALLED_APPSsetting innewsletter_site/settings.py.
1INSTALLED_APPS = [2 'newsletter.apps.NewsletterConfig',3 'django.contrib.admin',4 'django.contrib.auth',5 'django.contrib.contenttypes',6 'django.contrib.sessions',7 'django.contrib.messages',8 'django.contrib.staticfiles',9]
- We need to tell Celery how to find RabbitMQ. So, open settings.py and add this line:
CELERY_BROKER_URL = os.getenv('CELERY_BROKER_URL')
- We need to configure database settings:
1uri = os.getenv('DATABASE_URL')23result = urlparse(uri)45database = result.path[1:]6user = result.username7password = result.password8host = result.hostname9port = result.port1011DATABASES = {12 'default': {13 'ENGINE': 'django.db.backends.postgresql',14 'NAME': database,15 'USER': user,16 'PASSWORD': password,17 'HOST': host,18 'PORT': port,19 }20}
- We need to configure the SMTP server in settings.py . SMTP server is the mail server responsible to deliver emails to the users. For development, you may use a Gmail SMTP server, but this has limits and will not work if you have 2 FA. You can refer to this article. For production, you can use commercial services such as sendgrid.
1EMAIL_BACKEND = 'django.core.mail.backends.smtp.EmailBackend'2EMAIL_HOST = os.getenv('EMAIL_HOST')3EMAIL_USE_TLS = bool(os.getenv('EMAIL_USE_TLS'))4EMAIL_PORT = os.getenv('EMAIL_PORT')5EMAIL_HOST_USER = os.getenv('EMAIL_HOST_USER')6EMAIL_HOST_PASSWORD = os.getenv('EMAIL_HOST_PASSWORD')
For your reference, you can see the settings.py here.
Create env file
Create a .env file and assign the secrets.
1CDEMAIL_HOST=$CDEMAIL_HOST2EMAIL_USE_TLS=True3EMAIL_PORT=$EMAIL_PORT4EMAIL_HOST_USER=$EMAIL_HOST_USER5EMAIL_HOST_PASSWORD=$EMAIL_HOST_PASSWORD6CELERY_BROKER_URL="pyamqp://localhost:5672"7SECRET_KEY=$SECRET_KEY8DATABASE_URL=postgres://postgres:password@localhost:5432/postgres9POSTGRES_PASSWORD=password10APP_DOMAIN=*11DEBUG=True
Celery
We need to set up Celery with some config options. Create a new file called celery.py inside newseletter_site directory:
1import os23from celery import Celery45os.environ.setdefault('DJANGO_SETTINGS_MODULE', 'newsletter_site.settings')67app = Celery('newsletter_site')89app.config_from_object('django.conf:settings', namespace='CELERY')1011app.autodiscover_tasks()
Design and Implement Models & Configure Admin
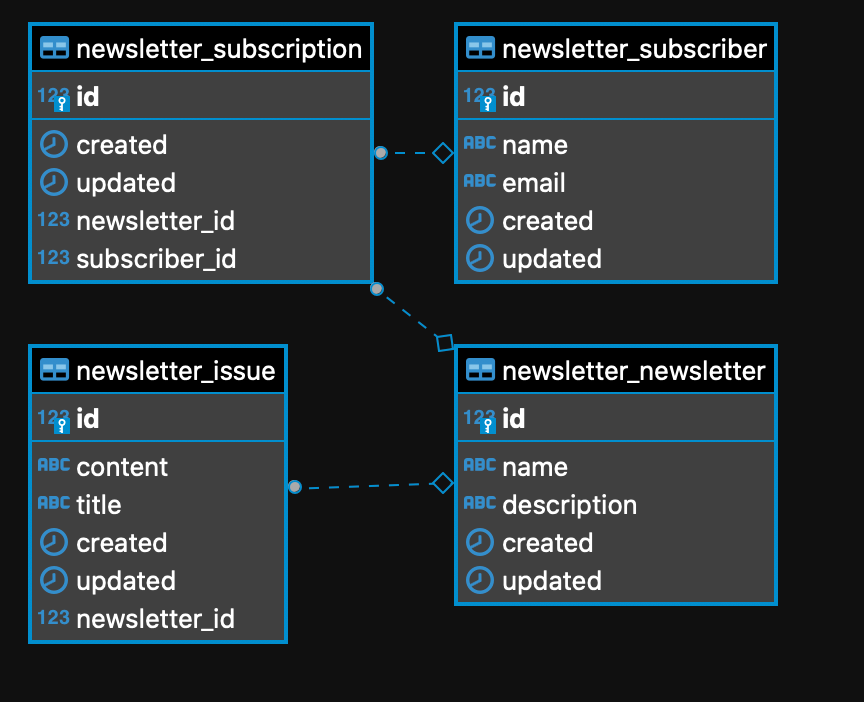
This is the schema we are trying to build. The schema is implemented here. Create a newsletter/models.py with the same content.
We need a UI to manage the newsletter. We will be using Django Admin for this purpose. Create a newsletter/admin.py with the contents of this file.
Register URL for admin in newsletter_site/urls.py:
1urlpatterns = [2 path('admin/', admin.site.urls),3]
Run the app
Run docker-compose to start the dependencies:
docker-compose up
Generate migrations for our models:
python manage.py makemigrations
To apply generated migrations to database run:
python manage.py migrate
To create a user for login run the following command and provide your details:
python manage.py createsuperuser
Run the following command to run the app and open http://127.0.0.1:8000/admin to open Django Admin :
python manage.py runserver
Run celery:
celery -A newsletter_site worker --loglevel=INFO
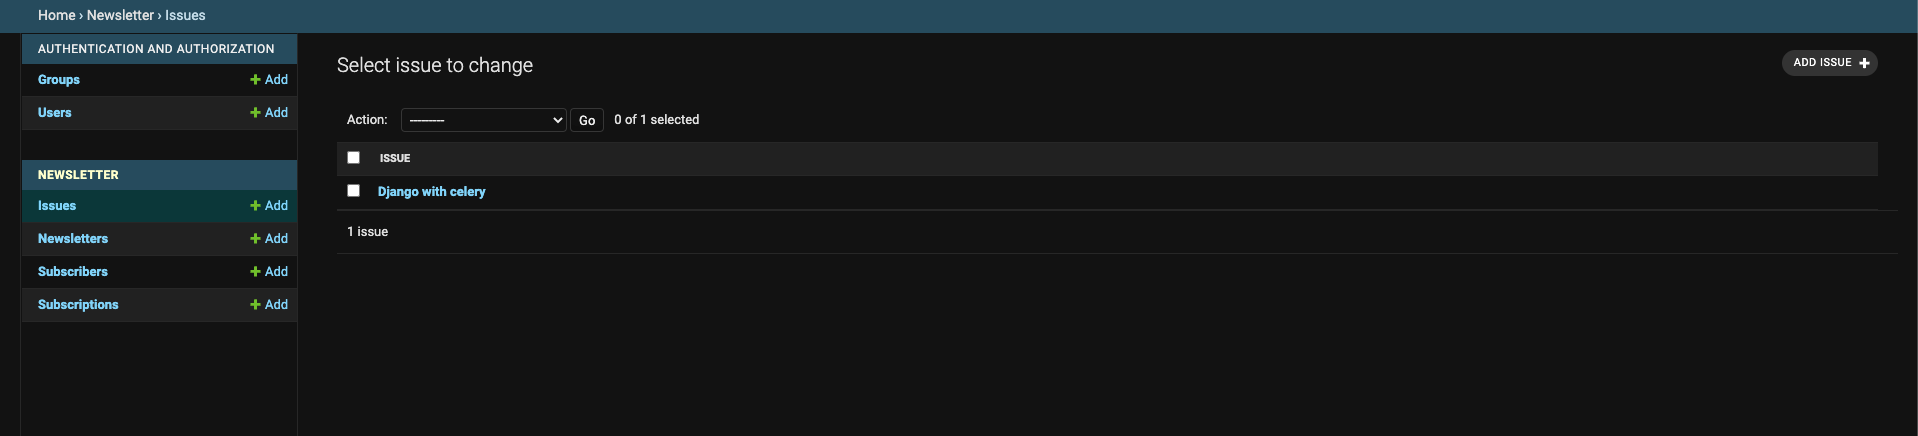
Add a newsletter and a subscriber and subscribe them to it. Create an issue and send it. If everything is fine you will see an issue arriving in your email.
How does it work?
When we click send the following action gets executed:
1def send(modeladmin, request, queryset):2 for issue in queryset:3 tasks.send_issue.delay(issue.id)456send.short_description = "send"
This code is responsible to queue up a new task to send an issue using celery. It publishes the task to RabbitMQ.
1@shared_task()2def send_issue(issue_id):3 issue = Issue.objects.get(pk=issue_id)4 for subscription in Subscription.objects.filter(newsletter=issue.newsletter):5 send_email.delay(subscription.subscriber.email, issue.title, issue.content)67@shared_task()8def send_email(email, title, content):9 send_mail(10 title,11 content,12 'newsletters@nancychauhan.in',13 [email],14 fail_silently=False,15 )
The Celery worker uses these tasks. When the producer produces a task the worker runs the corresponding task.
When we publish the send_issue task we determine the subscriber for the newsletter and publish sub-tasks to send the actual email. This strategy is called fan-out. Fan out is useful as it allows us to retry sending emails to a single user in case of a failure.
Conclusion
In this post, we saw how to use RabbitMQ as a message queue with Celery and Django to send bulk emails. This is a good fit where message queues are appropriate. Use message queue if the request is indeterministic or the process is long-running and resource-intensive. You can find the finished project here
Originally Published here.

